
Random Tech thread.
- Thread starter Jiggyfly
- Start date
- Joined
- Apr 7, 2013
- Messages
- 18,634
No....the Elite line is alive and kicking.
Jiggyfly
Banned
- Joined
- Apr 8, 2013
- Messages
- 9,220
Your best bet is to wait until after Christmas or around that time they start slashing the prices on the overstock.I'm thinking the 80 inch Sharp 240 hz looks pretty good. If I wait until Black Friday or so I bet I can find it in the mid 2K range down from low to mid 3K range now.
I bought a TV 2 weeks before Christmas by the beginning of the year I could have gotten it for 150 dollars cheaper.

TV's are kinda like cars now they start pushing out the older models for the newer ones after Christmas.
fortsbest
DCC 4Life
- Joined
- Apr 8, 2013
- Messages
- 3,844
True, so true. Just depends on if I can wait that long. I'd like to have it to watch the Rangers win the World Series this year!Your best bet is to wait until after Christmas or around that time they start slashing the prices on the overstock.
I bought a TV 2 weeks before Christmas by the beginning of the year I could have gotten it for 150 dollars cheaper.
TV's are kinda like cars now they start pushing out the older models for the newer ones after Christmas.

- Joined
- Apr 7, 2013
- Messages
- 29,006
I bought a new laptop yesterday and getting used to the new keyboard is a pain in the ass.
I'd kicked around the idea of going with a Macbook but for what I need the computer for I couldn't justify spending $1,400 for a laptop.
So I just went with a Toshiba Satellite with an AMD A6 Quad Core processor. It's a touch screen which is cool but can also be a pain in the ass at times.
The touch pad is too sensitive for my liking. I'm going to adjust the sensitivity.
BipolarFuk
Demoted
- Joined
- Apr 7, 2013
- Messages
- 11,464
Jiggyfly
Banned
- Joined
- Apr 8, 2013
- Messages
- 9,220
SAN FRANCISCO — Get ready for jumbo-sized Windows Phones.
Microsoft has announced an upcoming Windows Phone 8 update that will bring support for higher resolution screens that will pave the way for "phablets" from its hardware partners.
The company didn't reveal specifics, but in an official blog post Monday morning Microsoft said 5- and 6-inch oversized phones could sport 1080p HD displays. The bigger screen will allow more room for Windows Phone 8's signature "Live Tiles" interface — six tiles instead of four.
Last month, Microsoft agreed to buy Nokia's handset business in a $7 billion deal, so it wouldn't be a stretch to expect to see a large-format version in Nokia's popular Lumia line, or even a lower end Nokia phablet.
Mega-sized phone handsets from Samsung and others are riding a wave of popularity, especially in emerging markets. In a report last month, researcher IDC said it expects phablets to start taking market share from smaller-size tablets.
The Windows Phone 8 operating system update — which will begin rolling out to existing handsets over the next several months — also brings a new "driving mode"' and improved accessibility features, among other things.
And in addition to larger screens, the update will permit new hardware with added horsepower, in the form of Qualcomm's 8974 quad-core processor.
You'll see some "killer high-end devices" as early as this fall, Microsoft's Joe Belfiore told USA TODAY.
The update is Microsoft's third this year and addresses some top user complaints and requests, Belfiore said.
One of the biggest knocks on Windows Phone has been about the app ecosystem. Belfiore said there are now about 175,000 available apps and that the company is making "great progress" in expanding the app universe. Android and Apple devices each boast hundreds of thousands of apps.
In a period of "not too many months" consumers will be able to find "virtually any app" they are interested in, Belfiore said. Pandora, Hulu Plus and Tumblr have all arrived this year, with Vine and Flipboard among those expected soon.
Here's a quick rundown of some key features coming in the Windows Phone 8 update:
• Driving mode lets you make use of a connected Bluetooth device to limit notifications for texts, calls and the like while you are behind the wheel. You can also set up automatic replies to let people know you are driving.
• New accessibility apps, including a screen reader, are aimed at making it easier for the visually impaired to use the devices for texting, e-mail, Web browsing and more.
• Manual control over closing apps (a top user request, according to Belfiore).
• Rotation lock to keep screen orientation fixed as either horizontal or vertical (useful for when you are, say, reading in bed). This one has long been a feature on Apple and most Android devices.
• New storage management settings let you free up space on your phone.
While still vastly trailing Google's Android operating system and Apple's iOS, Windows Phone has gained market share in recent months and has begun to solidify its position as the No. 3 mobile operating system, surpassing beleaguered BlackBerry.
In its second quarter report, IDC noted that it posted the biggest gains year-over-year among top OS's.
Follow Nancy Blair @nansanfranon Twitter.
Jiggyfly
Banned
- Joined
- Apr 8, 2013
- Messages
- 9,220
A practical guide to calibrating your TV
Tyler Wells Lynch and Lee Neikirk, Reviewed.com / USA TODAY 1:13 p.m. EDT October 15, 2013
Taking a few small steps to calibrate your TV can make your TV much more pleasant to view.
Adjusting backlight makes your TV look brighter in sunny rooms and easier on the eyes in dark rooms
Contrast settings control the intensity of white parts of the screen, and brightness the black areas
As a rule, you almost never have to change your color settings
Whether you spent a load of money on your TV and want to make the most of it, or are just trying to make your small-screen discount special look like a million bucks, a little bit of calibration can go a long way.
Tinkering with settings doesn't need to be intimidating. If you already like the way your TV looks, you probably don't need to calibrate it. But if your screen isn't bright enough, if it just doesn't look right, or even if it's giving you a headache, a few basic tweaks will help to clear up most problems.
BACKLIGHT
In an LCD/LED TV, the backlight is like the flashlight that lights the puppet show. A higher setting here increases the brightness of the entire screen.
There is an ideal setting that will keep your picture from being either too dim or too bright, and it depends almost entirely on the room's lighting. In a sun-drenched living room, a brighter backlight allows the TV to compete with that brightness, reducing glare. In a dim basement, a darker backlight makes the TV easier on the eyes.
To adjust your backlight to the lighting in the room, turn it down until it's too dim, and then slowly bring it up until it feels comfortable to watch.
CONTRAST
Once you've set your TV's backlight to suit the room, setting contrast is the next logical step. Another mislabeled term, the "contrast" setting on an HDTV actually controls the intensity of the whitest areas on screen.
At big-box retailers you might notice that the display TVs have an almost painfully bright and flashy look. They're only set that way to grab your attention. At home, you'll want to turn the contrast and backlight settings down — the defaults "Movie" or "Cinema" modes are fine for most rooms.
BRIGHTNESS
Counterintuitively, the brightness setting actually controls the black areas of the picture. So a more apt name might be "darkness."
This setting is usually set to the correct levels by default. Turning it up too far will wash out areas of the picture meant to be black, and turning it down too far will blacken some of the colors, eliminating vital details in movies and shows. If you want a darker picture, turn brightness down just a few clicks.
SHARPNESS
Sharpness is essentially a relic from the days of analog TV. It's unnecessary in today's digital world because your set-top box or disc player determines the sharpness before it arrives at your screen.
When you turn sharpness up, the TV exaggerates the areas where bright content and dark content meet, which creates unwanted halos. Our advice is to turn sharpness down to zero—or at least no higher than its factory default.
COLOR
If contrast handles white levels, and brightness handles black levels, color simply adjusts how "colorful" the picture is. This is why turning color down to its minimum setting gives you a black and white picture.
As a rule, color almost never needs to be changed. The default setting — usually 50 — results in a color saturation that is correct by international HDTV standards. However, turning it up a few clicks might look better to your eyes.
The most important thing is to find a picture that you're comfortable watching — and these adjustments should help get you there.
For more product reviews and news, visit Reviewed.com, a division of USA TODAY, and follow @ReviewedDotCom on Twitter.
Jiggyfly
Banned
- Joined
- Apr 8, 2013
- Messages
- 9,220
HTC One max with fingerprint scanner unveiled
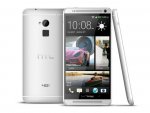
HTC has had a difficult time out-dueling rival Samsung in the marketplace even though its HTC One Android smartphone compares favorably to Samsung's Galaxy S4 flagship.
Now, HTC is going after Samsung in the super-sized smartphone category known as "phablets." The Taiwanese company has just announced the new HTC One max, with a 5.9-inch, full-HD 1080p display that comes in even larger than the latest Samsung Galaxy Note 3, which has a 5.7-inch screen.
Also, HTC one-ups Samsung with at least one new addition, a Fingerprint Scan feature on the back of the device that folks can use to lock or unlock the screen and launch up to three designated apps (by assigning a different finger to each). Unlike the Touch ID fingerprint scanner that Apple has placed on the new iPhone 5s, you cannot use HTC's scanner to authenticate purchases, at least for now.
HTC One max has 32GB of onboard storage and comes with 50GB of free Google Drive online storage. You can also expand the memory via microSD card slot that's hidden behind the removable back cover, but the battery cannot be removed.
HTC One smartphone owners who try out the phablet will experience a similar look, feel and metallic design. The biggest difference, of course, comes with the bigger form factor and heavier (little over 7 ½ ounces) weight. And some changes are subtle, with the power button moving from the top to the side.
There's a personalized HTC BlinkFeed home screen, now with fresh content from Instagram and Google+. HTC says up to 120 articles can be downloaded for offline viewing.
There's also an UltraPixel camera with the HTC Zoe mode that grabs bit of video while you're snapping a still. A Video Highlights feature creates a mini-movie backed with a soundtrack.
Like its smaller sibling, the max has dual front-facing stereo speakers, but HTC is now pushing its own HTC Boom Sound. Beats Audio is not on this latest device.
Sprint and Verizon Wireless will carry the HTC One Max and have it out prior to the holidays. Pricing has not been announced.
Follow Ed Baig on Twitter: @edbaig.
Jiggyfly
Banned
- Joined
- Apr 8, 2013
- Messages
- 9,220
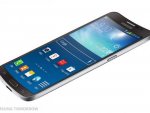
Samsung introduces curved display smartphone
STORY HIGHLIGHTS
Galaxy Round has 5.7-inch Super AMOLED screen
Flexible display lets users check date, time and other info even when the home screen is off
Rival LG is starting mass production of its own flexible display panels for smartphones
Here come the bendable smartphone displays. Samsung has announced the Galaxy Round smartphone, which the Korean electronics giant is calling the "world's first curved display smartphone."
Galaxy Round sports a 5.7-inch full HD Super AMOLED screen that will let users take advantage of a "Roll Effect" to check the date, time, missed call, and battery status information, even when the home screen is off. A separate "Gravity Effect," Samsung says, will let folks interact with the phone by tilting it. Samsung also says that when the music player is running but the display is off, the user can press the left side of the device to play the previous track or the right side to play the next track.
The phone will be sold in Korea only for now, and Samsung hasn't announced pricing or potential U.S. availability.
The news comes a few days after Samsung's Korean rival LG announced that it will start mass producing a flexible OLED display for smartphones. The flexible panels use plastic instead of glass, which allows them to be bendable.
The panels could arrive next year.
fortsbest
DCC 4Life
- Joined
- Apr 8, 2013
- Messages
- 3,844
Well I finally settled on an new TV last week. Bought the Samsung 7100 model 65" 240 HZ. I wanted bigger but just couldn't see paying 4G plus. This one is going upstairs for now. Out TV downstairs may have another year left on it and when it goes, I'll move the new one downstairs and look for 80 plus again upstairs. Hopefully by then they'll be a bit more reasonable. I need to put about 100 hours on this one and then I'll calibrate it, but I'm really pleased with the performance for now.
D
Deuce
Guest
I have a suspicion I'm getting Apple TV for Christmas. Anyone have it? Comments/complaints?
Texas Ace
I'll Never Dream Again
- Joined
- Apr 7, 2013
- Messages
- 26,559
How much is it going for now? And what size is the screen on the mini?Has anyone played with the new iPad Mini with Retina display?
I'm getting one monday.
Might get one for my wife.
BipolarFuk
Demoted
- Joined
- Apr 7, 2013
- Messages
- 11,464
I think they are $399. They are not that much better than the competition. You can get a Google Nexus 7 or Kindle HDX 7 for $229. I caught the HDX on sale for $179.How much is it going for now? And what size is the screen on the mini?
Might get one for my wife.
dallen
Senior Tech
- Joined
- Jan 1, 2000
- Messages
- 8,466
$179 @ Office Depot right now http://www.officedepot.com/a/products/870743/Google-Nexus-7-Tablet-2013-16GB/?cm_mmc=Affiliates-_-CJ-_-1122587-_-11272891I think they are $399. They are not that much better than the competition. You can get a Google Nexus 7 or Kindle HDX 7 for $229. I caught the HDX on sale for $179.
dallen
Senior Tech
- Joined
- Jan 1, 2000
- Messages
- 8,466
Apparently if you go to Staples.com you can ask them to price match that and then use a coupon to get it down to $165.
http://slickdeals.net/f/6554408-nexus-7-16-gb-2013-165-tax-staples-fs